My Printmaking Process
(entry by John Amoss)
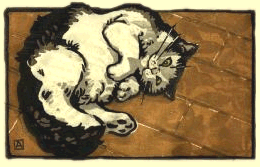 This is a print of my cat,
Gulliver called 'Warm Spot'. It is only my second water-based
woodblock print and was quite a challenge for me in every
respect.
I tend to lean toward the traditional methods, but there are many
ways to 'skin the cat' (pardon the pun).
As for my "studio"- I work in a room close to a bathroom sink and
tub. Good light and a sturdy table are the only other
requirements.
These are the steps I took to make the print:
Initial Sketch - (time taken: 2 hours)
 I started out with a drawing from my sketchbook
(see right). I then enlarged the sketch to oban (roughly 15" x
10" size) and made an ink brush drawing of the sketch. I chose to use
relatively thick outlines to 'trap' possible color misregistration
problems that can occur while printing the colors. After the inking
was done, I scanned it into my computer using a paint program (the
computer is certainly a help here, but not at all necessary). I then
imported the image into a drawing program, flipped the image
horizontally (the image will be mirrored when printing) and outputted
it as black and white line art, including the registration (kento)
marks. The kento marks should be carefully 'squared' with the image.
Please note: Instead of a computer, you can easily flip the drawing by using tracing paper.
Board Preparation - (time taken for 3 blocks: 6 hours)
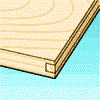 The next step is to prepare the boards. I chose
12 inch-wide basswood blocks and added 'hashibame' strips on the ends
(a kind of truss rabbeted into the endgrain to reduce warping). They
were then sanded with coarse, medium, then fine sandpaper sheets
mounted on sanding blocks. I lightly coated the printing surfaces
with a 50/50 mixture of shellac and alcohol. This was suggested to
strengthen the surface of the wood. Basswood is known for its clear
grain and for its ease in cutting because of its softness. This
softness becomes a problem on occasion, especially when carving fine
lines on the keyblock. The boards were left to dry for an hour and
then were lightly sanded to smooth the grain that had risen. Before
continuing, it helps to view the board at a 'raking' angle, to look
for sanding or planing marks. After preparing the boards, I selected
the best piece for the keyblock.
Transfer of Sketch - (time taken: 45 min.)
To transfer the keyblock image to the wood, I placed a piece of graphite paper on the board and taped the printout securely to the top and bottom edges. I very carefully traced both sides of the black lines using a colored ball-point pen. Pressure must be hard enough to transfer, but care must be given that the marks do not indent the wood's smooth surface you have worked so hard to achieve.
Before checking the transferred image, I then took a chisel and cut the registration marks through the printout 1/8" into the wood. After taking off the printout and tracing paper, I marked the areas needed to be cleared by drawing x's in pencil. This is especially helpful as my mind easily wanders while I carve and it is very easy to lose track of what you should or shouldn't clear.
Carving - (time taken for one 10" x 15" keyblock: 8 hours)
In woodcuts you must remember that the areas left raised become printing surfaces. Therefore, whatever is carved does not make contact with the paper, resulting in a blank area. This can be initially confusing as most artists are used to additive processes like painting, rather than subtractive. It soon becomes apparent how much skill it requires for master carvers to replicate the brush strokes seen in so many old prints. Painting is hard; carving that painting is doubly so.
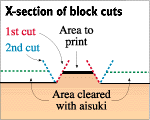 My carving began by using a knife designed for
this purpose- a 'hangi-to', but an Exact-o knife will do. You must
cut at a 30-degree angle sloping away from the line. The next cut is
a little to the outside in order to free the wood, revealing a
v-shaped gully. It is fun to try to have a clean, single piece of
wood pop off the board, but it is hard to get it right at first. For
me, it helps to imagine the knife point's travels beneath the wood's
surface. Using the traditional knife required both hands - one to
pull the knife toward you and one to guide the blade. This allows for
great control. I is important to pay attention to the grain of the
wood. For example: Say you are carving an circle, starting against
the grain. As the arc turns, the line turns more and more "with the
grain" -or parallel to it. Once this begins to happen, cutting
becomes easier, therefore requiring less force. But if you don't ease
the pressure, the knife is liable to slip from you causing terrible
accidents both to you and your board. I'd suggest using some scrap
wood to practice. Start with straight lines at the 30º bevel and
try your hand at arcs, intersecting lines, whatever.
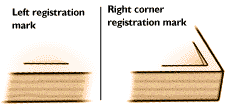 Be sure to clear the registration marks made by
the chisel. There are a few ways to make them, this is the easiest
for me.
 After all
shapes have been outlined with the v-shaped gullies, the chisels are
brought out to clear the large areas. This is where I would spend a
few bucks and get some good aisuki - bull-nosed chisels. You hold
these tools in the crook of your thumb and forefinger allowing for
the great control needed to avoid destroying previous carving. The
bull-nosed chisels are wonderful as they clear wood smoothly with
little tear-out. For the larger areas, round chisels are brought out.
How deep to carve? I would suggest that the depth in the widest cleared areas should be around a quarter of an inch. The closer to the lines, the more shallow the clearing can be. You should leave a 'gulf' at least 2 inches away from any surfaces to be printed. If shapes are far apart from each other, islands in the gulf should be left to support the paper, keeping it from sagging, which causes all sorts of registration problems.
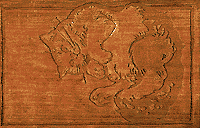
To the right is a picture of the keyblock at this point.
Keyblock proof - (time taken: 2.5 hours (includes soaking time))
I then prepared the paper destined to be the 'kyogo' or printguide. This is a proof print to look for carving problems and to establish a guide on which to base the color block designs. I cut five pieces of sized paper to the right dimensions. I then dampened them by brushing a small amount of water on every other side, and placing them in a plastic bag for a couple of hours. I also soaked the woodblock in the bathtub using a weight to submerge the wood. A mixture of sumi ink was prepared along with the rice paste. Before printing, I also soaked a shoebrush that I will use to apply the ink. OK, all set.
I took the block out of the bath and gently wiped it - carefully observing the beautiful surface that will soon be covered in ink. I took the board to a stable tabletop. I then applied a dab of paste in the large areas of the block (like the tail fur) and loaded up my shoebrush with some diluted sumi. I gently brushed the ink on the block, mixing the paste as I went. I looked to make sure the ink still had some gloss to it, but avoided any puddles that can occur in small trapped areas. I grabbed the sheet of paper with both hands, affixing one corner to the corner registration mark first, then lowering the edge down to meet the straight registration mark. The paper could then safely be lowered while grabbing the baren.
First I rubbed the paper down starting from the corner registration mark lightly zigzagging to the opposite corner. This is to tack the paper down before the main impression. I learned to rub lighter for fine lines, larger areas needed a lot of pressure. His tail area required nearly all of my weight for good results. Before lifting up the entire sheet, I pull up a corner at a time to peek at the image underneath. Usually, I have neglected a certain area and have to rub harder here and there. It takes several printings to know where to rub and for the wood to become saturated with ink. That is why I was prepared to make five copies and it may be good to do a few more for good measure.
After getting a few good prints, I place them between blotters under a few heavy books and let the things dry for a day.
'Color Scheming' - (time taken: 3 hours)
The next step is to prepare the color separations. I painted directly on the prints with watercolors. After coming up with a simple color scheme ( I am using 7 colors here), I tried to think of ways to group as many colors on one block as I could using both sides of the wood. Remember that a space of 2" should be left between colors.
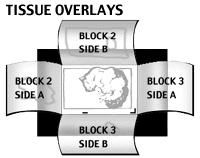 After the color scheme was decided, I mounted 4
sheets of tracing paper to each edge of the black keyblock print
guide to act as hinged overlays. I can check each color area against
each other using the transparency of the tracing paper. I traced the
lines to indicate the specific color areas, taking care to indicate
registration marks. I also enlarged each color area around a 1/16th
of an inch to allow for overlap into the keyblock's dark outlines.
The color separation sheets were then detached and transferred to the
color wood blocks using graphite paper as before, except that the
color separation drawings were flipped upside down (as the keyblock
drawing was originally flipped). Check to make sure that the tracings
will match the keyblock and read in the right direction. When
choosing which block for which color, avoid knots or blemishes when
selecting the boards as such imperfections tend to show when
printing.
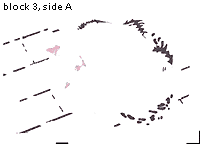
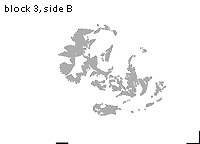
The block separations came out as follows:
- (block 1, side A) color 1: black keyblock (see above)
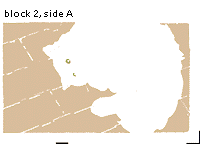
- (block 2, side A) color 2: tan background/ color 3: yellow eyes
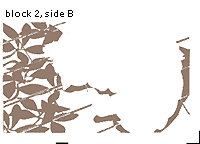
- (block 2, side B) color 4: light brown leaf shadows
- (block 3, side A) color 5: pink nose & ears/ color 6: dark brown fur
- (block 3, side B) color 7: gray fur shadow

Carving the color blocks - (time taken: 15 hours)
The color blocks are carved as the keyblock. I would recommend printing a color proof using approx. 20 sheets of paper to make sure that colors are fitting together well and that the blocks have been carved correctly. The prints should be reviewed after they have been dried as some colors lighten considerably when dry.
Main Print Run - (time taken: 24 hours)
The main printing is just a repeat of the process described above with the key block guide. The only real danger is misregistration of colors. The registration marks can be pared away or added to with shims so that the color positions can be changed. It can be tricky to decide whether to add or subtract from your registration marks and I would suggest that you put a sliver of wood against the registration mark and print one copy to make sure you are going in the right direction before removing wood. Better yet, cut the marks a little short and pare them away during the color proofing stage.
For pigments, I used high-quality tube watercolors as ink along with diluted sumi for the keyblock. Try to keep the prints in the same order throughout the process. Although it may not show on this first print, the blocks will slowly shrink or expand while printing and you want to keep the conditions the same for all impressions. You might number them lightly on the back before wetting.
Troubles:
Printing seems to me to be the hardest part of the whole process. Initially, I thought that the carving would be, but the "proof is in the printing".
I had much trouble with moisture content while printing. It took four full days to print the 50 copies. Much water was introduced in several areas of the print throughout the printing process and in other areas I had the opposite problem, the paper began to dry out - especially near the edges. If too much moisture was in the paper during printing, a 'squeegee' effect started, pushing and blurring the adjacent colors across the wood grain. Also, the ink didn't seem to penetrate the paper as readily if too much water was in the paper.
If the paper started to dry out, it wouldn't lay flat on the block causing registration problems. Interestingly enough, the ink didn't penetrate the dry paper either. I suspect this happens because the paper isn't soft enough to contact the block correctly, resulting in a grainy effect.
Next time, I plan to place dampened blotting paper within the pile the night before to equalize the moisture. Also while printing, I plan to keep the paper in a plastic bag - but that could become a hassle. When drying the prints I also need to introduce dry blotting paper periodically to achieve a nice, flat print.
The wet woodblock boards were stored on end leaning against a wall, rather than flat on the floor. This reduces warping.
In Conclusion
Well, if that sounds like a lot of work, it was, but it was also a lot of fun. I would suggest looking at what has been done in the Baren site and to try to see a 'real' print up close. The striking beauty of a well-made print is unbelievable and can fuel your enthusiasm for many years to come. Thanks to Dave and everyone in [Baren] for all of their help!
Please message me with comments or questions and I'll be happy to help the best I can. From one beginner to another, good luck!