Basic Carving Tools (entry by David Bull)
Questions on carving tools - "What tools do I need?" - "Are Japanese knives the best?" - "Do I need to buy such an expensive kento-nomi?" - make up far and away the largest category of questions that come in my email. That this should be so is a bit of a puzzle for me; my impulse is to answer them all, "Don't worry so much about exactly what tools to buy! Get hold of any kind of cutter from your local hardware store, and get started carving. Once you've been at it a while, you'll have a better understanding of what sort of tools will be useful to you ..."
My first few prints were made using nothing but an X-acto knife, and yes they were indeed pretty bad. I rather suspect though, that even if I had used specialized woodcarving knives and chisels, there wouldn't really have been a whole lot of difference in the results ...
But of course this is not the answer that most of the correspondents want to hear. So I'll console myself while writing this little description, with the hope that you who will read it have already tried a bit of printmaking, are interested in doing more, and would now like to get some proper tools. Be warned though, that when I say 'proper', my bias means that this will be the sort of tools that are used in the Japanese traditional techniques. There are many many different sorts of knives, cutters, chisels, and gouges out there in the shops, and they will all make marks in wood. But I can only write of what I know, so this particular Encyclopedia entry will thus be somewhat restricted in scope.
'Restricted' ... to the group of tools used to make that astonishing creation known as the Japanese woodblock print ...
Before trying to describe each specific type of tool, I have to mention something about the special way in which nearly all Japanese cutting tools - from mundane kitchen knives right up to exotic swords - are made. The blacksmith making any particular blade is faced with a very basic trade-off when he selects his steel. If he chooses a type with a relatively high quantity of carbon added to the iron, the blade will be very hard, and capable of being sharpened to a keen edge - but it will be quite brittle, and easily broken. If he chooses a low carbon type of steel, the blade will be much less likely to break or chip, but it will not hold a fine edge.
The Japanese blacksmith's answer to this dilemma is to make his blades by using a lamination of both types; a high carbon steel for the part of the blade that is to carry the cutting edge, and a 'backing' layer of lower carbon steel for support. Ingots of steel of the proper size and shape are hammered together when in a near molten state, and the two layers fuse together into a single blade. But they do not blend together, and the dividing line between them can clearly be seen in the finished tool - the area with the more 'white' and shiny appearance being the higher carbon steel.
Whenever you are looking through a tool catalogue, and wondering why some of the knives are so much more expensive than others of a similar type, it is the way that this laminating process has been handled that is to 'blame'. A knife made from a high-quality steel, laminated at the proper pressure and temperature, will obviously be more expensive than one made in a more sloppy way. To the beginner, the difference may not be very appreciable, but once some experience is gained, the more expensive tool will bring greatly increased efficiency and far more pleasure in its use.
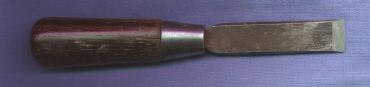
Hangi-to
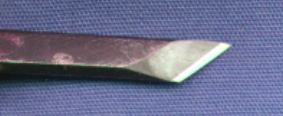
Pronounced 'hang gee toe', and also known as the 'chokoku-to' or more simply 'to', this is the basic carving knife that forms the heart of any set of carving tools for woodblock print making. It is the only member of the set that is asymmetrical, and thus comes in both left-handed and right-handed versions. It is commonly available in sizes from 1.5mm up to 9mm in width. (This photo is of a 6mm 'standard' size 'to', right-handed type).

The handles of these knives are made of a hard wood, usually cherry or ebony. The blades fit into a small slot cut into the handle, and are held in place by a ring of brass. This ring may be easily slipped off to allow the blade to be slid forward as it becomes worn down through repeated sharpening (and then eventually replaced).
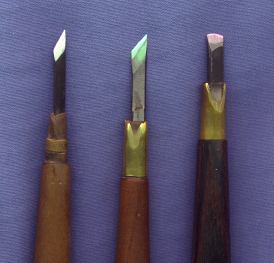
If you look in the toolbox of an experienced carver, you will see quite a collection of these knives; in addition to narrow ones for delicate work and wide ones for heavier cutting, he will have an assortment sharpened at different angles to suit different types of work. A blade sharpened at an acute angle as in the knife on the left in this next photo is suited to work that involves sharp curves and small circles, etc. It is difficult to control on long straight lines. The centre knife is sharpened at a more all-purpose angle (perhaps a bit too much on the 'acute' side ...), and the one on the right is a blade specifically for cutting straight lines; the low angle means that more of the metal is 'buried' in the wood at any given moment, and is thus less inclined to wander. (These three are for left-handers.)
Ai-suki (ah ee soo kee)
The word literally means 'the inbetween becomes transparent', and that may (or may not!) give a hint about how these chisels are used. They have a flat blade with a slightly rounded nose, and are used with a pushing motion to clear away wood from between lines carved with the hangi-to. Common sizes are from 1mm up to 6mm.

The handle is usually made from a hard wood (sometimes bamboo), and is made in such a way that it can swivel open to allow the blade position to be adjusted after sharpening.
Unlike the case with the hangi-to, where the 'extreme' sizes are seldom used, the full range of sizes of the aisuki is in regular use. When it comes time to start the clearing work on the block, the carver is constantly reaching for the chisel that fits the particular space that needs to be cleared at any moment. For areas much wider than 6mm, the hammer-driven chisels are used (see below), but for anything under this dimension, the aisuki does the job.
In addition to the store-bought aisuki, which are usually obtainable only down to the 1mm size, many carvers also have a selection of smaller ones they have made themselves. A common type is made from a broken-off sewing machine needle inserted into a wooden handle and sharpened to a narrow point (the left-most chisel in the group of five above is one of these). The metal such needles are made from is extremely resistant to breaking, and the point is used with a prying motion to dig in and 'pop out' the slivers of unwanted wood between carved lines.
Maru-nomi
The word means 'round-chisel', and unlike all the other tools mentioned so far on this page, this one is used with a hammer or mallet.
The blade has a 'U' shape when seen face on. Typical sizes range from 4.5mm up to 15mm, in two general types - shallow or deep. They are used to quickly remove waste wood from open areas of the block.
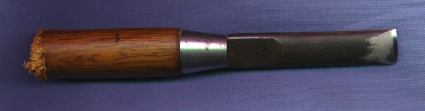
Soai-nomi (so ah ee no me)
A sort of sub-group of the 'hira-nomi' (flat chisels), the soai-nomi have slightly rounded corners, and leave a cleaner block than the hira-nomi. They are used with a large mallet to clear away any wide areas of unwanted wood from the block. (The one I've got here, an old treasure bequeathed to me by an older carver, is actually almost 'square' enough to be classified as a 'hira-nomi'.)
These chisels range in size from 9mm to 30mm, with a 21mm width being perhaps the most common.
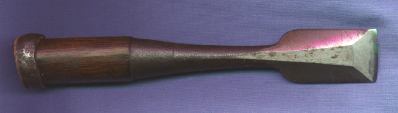
Kento-nomi
This is perhaps the last chisel that should go on your shopping list. It is usually very expensive, and is used on only one occasion - when cutting the two registration marks on each block. It has a simple straight blade, and is kept in an extremely sharp and perfect condition, in order that the marks may be cut as accurately as possible. It comes in only one size - 15mm. (It is worth noting that this 'carving' tool is also found in the printer's toolbox - he is the man who cuts the registration marks on the colour blocks, not the carver.)
That's it ... for the standard traditional selection of carving tools. Carvers working in the old style used no other tools than this, but it would be remiss not to at least mention two additional types now in common use ...
Koma-suki
- These are a family of 'push-type' chisels, used in the hand like the aisuki (without a hammer), but with a U-shaped blade rather than a flat one. They have the same size range as the aisuki, from 1mm up to 6mm. They cut a small 'trough' shape in the surface of the block.
San-kaku to
- The word means 'triangular knife', and this corresponds to the western 'V' shaped gouge. These also typically range from 1mm to 6mm.
I can't show you photos of these two types, because I don't have any of them!
So much for the basic description, but just which of these tools do you really need to start making woodblock prints?
Obviously, without knowing what sort of prints you want to make, I cannot give you a definitive answer about what you should buy. Let me here simply give an outline of what I use. This advice will be most appropriate for work being done in the traditional Japanese 'outline' style ...
Here is a complete list of my carving tools:
- Hangito 3mm, 4.5mm, 6mm (a selection sharpened in a variety of ways as outlined above)
- Marunomi 6mm (deep), 15mm (shallow)
- Soainomi 24 mm
- Aisuki 1mm, 1.5mm, 3mm, 6mm (plus a couple with very fine points made from sewing machine needles as outlined above)
- Kento-nomi
These tools are listed here in the same order that I use them in cutting a block. First the outlines are all incised with the hangi-to. When that's done, the marunomi is run around in the wide open areas staying just 'offshore' from the cut lines. Next, the soainomi takes away the unneeded wood in the wide open areas. Finally, the aisuki trim away the waste between the marunomi trench and the cut lines. All my work is done with this relatively small group of tools. (The marunomi and soainomi are used with a hammer, the aisuki are 'pushed', and the 'to' is drawn towards you.)