Sharpening Stones (entry by David Bull)
When I was a little kid, no matter where we lived, my father always had some kind of workshop - usually in the basement of the house. He certainly wasn't any kind of master craftsman, just a typical handyman father, and all during the time that us kids were growing up he turned out a pretty constant stream of toys for us - doll houses and such for my sister, and miniature garages and toy boats for my brother and I. I no longer have any of those toys, I guess they were all passed on to other kids when we grew out of them, but I would very much like to have some of them here for inspection now. In my mind's eye I see them all as being beautifully fashioned and carefully crafted, but I suspect that in reality, they were rather more 'rough'.
Because although he had the important part right - he did get the toys made - his carpentry was of a pretty basic kind, and I am almost certain that he didn't own any sharpening stones. He bought a tool, and pushed it into the wood. When it wouldn't push so easily any more, he pushed harder. When after years of real pushing, it got to the point where it wouldn't function at all anymore, that particular tool just sort of got lost in the pile of stuff up there on the workbench, and another one would replace it ...
So it was that when I was making my first attempts at woodblock printmaking (long after I had left home ...), this is the sort of woodwork that I too became accustomed to practice. After making a couple of feeble trials with Xacto knives and similar tools, I bought a few 'real' Japanese tools and started to use them. They cut great ... at first. But of course, as time went by and the edges became rounded, the cutting work became more and more difficult. I kept on using them though - I had sort of imbibed my father's attitude 'You don't have to get all that fancy professional stuff. Just make do with what's at hand.'
When I think back to those early days of printmaking, and count on my fingers just how many years I worked with those tools (more than five ...), and how many prints I made with them (nearly two dozen ...), I find it hard to believe that I did it without even owning any sharpening stones. 'That sort of stuff is for professionals ...'
So why am I telling you all this now? To make you think that you don't need sharpening stones? No, of course not. I want to convince you of just the reverse - the thing that I have finally, finally learned - that without a set of sharpening stones near your carving bench, your work is going to be a lot harder ... you are going to cut yourself much more often ... you are going to exert far more physical effort than you need to ... you are going to have a tool kit that will be the shame of the neighbourhood ... and of course, your finished prints are going to look much worse than they need do.
Do you need any more reasons? I don't think so. Please buy yourself a set of stones for your tools. You'll need three of them, and they won't cost you very much at all. Sharpening will be difficult at first, but you'll get better bit by bit as time goes by. Discover the pleasures of using sharp tools. It took me too many years to learn that lesson - don't you be the idiot I was.
Whole books have been written about sharpening stones, and they can sometimes seem to be quite a confusing topic. So let's start with some basics:
- There are two general types of stones, those used with oil, and those used with water. In the Japanese tool tradition within which I work, oil stones are not used; all sharpening is done with water stones. The rest of this page will deal only with water stones.
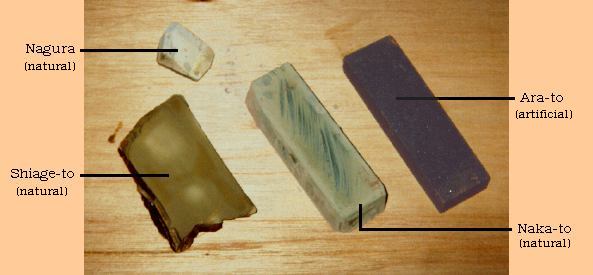
- Water stones are broken down into three general groups: rough, medium and fine.
- Water stones are available in two forms: natural (from a quarry) and man-made (from a factory).
Ara-to ('rough stone')
The least used of the three stones, this is the roughest one, with the largest grit. It is normally used when the tool has been nicked, chipped or broken, and a large amount of metal must be removed. It is also used when a change in the blade angle is desired, necessitating the removal of a lot of metal.
Natural ones are usually dark grey or blue grey, and man-made ones are usually blue grey or black. These stones can vary from quite hard to quite soft, with some types eroding very rapidly. In the western numbering system, a typical ara-to would be about an 800X.
When in use, an ara-to must be frequently flushed with water, to keep the mud and metal particles from clogging the surface.
Naka-to ('medium stone')
This is the workhorse of the trio of stones. If the tool is sharpened frequently and not allowed to become overly dull, it will take only a few strokes on this stone to restore the edge to the proper level of keenness.
Many types of naka-to are available, with some common natural ones being a dirty 'stone' colour, and a common man-made type being iron-red. They vary widely from quite soft to quite hard. A western equivalent would be about 1200X.
Shiage-to (She ah gay toh) ('finishing stone')
Also known as 'awase-to', these stones are used to remove the burr created by the naka-to and to put the final polish on the blade. In western sharpening, this stage is done with a leather strop, but no such tool exists in the Japanese tradition.
Natural ones are usually grey, whitish or a streaky yellow-beige, and man-made ones are commonly a yellow colour. Western stones of this type range from 4000~8000X.
Water
All these stones are used with water of course, but they differ in detail.
Natural stones are used by pouring or dripping water onto the top surface of the stone just before use. Man-made stones however, usually being much softer and porous, need to be soaked underwater for 10~20 minutes before being used. If not, they 'drink' the water much too quickly during use, making them very difficult to use. (My ara-to 'lives' underwater in its wooden bucket, only coming out to be used, something that would not be possible with a natural stone, which would start to crumble if treated this way.)
Whatever the type of stone, as the water soaks down into the stone during the sharpening process, more must be daubed or dribbled on as needed.
Nagura
There is one more type of stone that must be mentioned, without which some of the other stones cannot be used. This is the 'nagura', a lump of soft whitish stone, which is rubbed over the moistened top surface of a hard sharpening stone to create some 'mud'. Without mud, the sharpening action is greatly reduced (or nonexistent, in the case of very hard finishing stones). It also helps to keep the surface of the stone level, being rubbed over the 'high' spots to wear them down.
Natural or Man-made?
In the 'old' days, man-made stones were looked down on, but those days are long gone, and modern artificial stones have considerable advantages in quality, consistency and price. Natural stones need much more care, tend to vary widely from one to the next, frequently have hard mineral spots 'buried' in them, and are more expensive.
But they sure look and feel neat!
Stone Maintenance
Keeping the top surface of a stone flat and true can be a difficult process. If one keeps rubbing the tool in the same spot, any stone will quickly develop a groove or depression, so try and constantly move around onto fresh areas of the stone, and turn it end for end frequently.
But no matter how careful one is, depressions do start to develop, and if left untreated it becomes impossible to keep a flat edge on the tool blade. The treatment varies a little for each type of stone ...
Ara-to: An excellent method is to use a concrete building block, or a smooth spot on a concrete sidewalk. Splash plenty of water over it, kneel down, and rub the stone around until the hollows have disappeared and the surface is flat. Be careful that no large particles of grit are present to cause scratches. Turn the stone around frequently during the process so that you don't wear it down unevenly on one end. Lots of 'mud' will form during the process - leave it there, it will help the grinding. Splash more water on as needed. When you get near the end, bear up a bit on the pressure ...
If you have more than one stone, do them both and them rub them together face to face for a final smoothing.
Naka-to: The sidewalk is probably a bit too rough for this stone. Leave it in place on your workbench, and use the ara-to with plenty of water to dress it down smoothly. As above, when nearing the end of the process, reduce the pressure to avoid leaving deep scratches. When the stone is flat, make a final smoothing with the nagura.
Shiage-to: The ara-to is too rough for this, so use the naka-to. The procedure is the same, but the pressure should be fairly light and delicate, as it is very easy to cause scratching. Lots of water and mud will help. When the depression is nearly gone, and the shiage-to becomes quite flat, the two stones tend to stick together tightly. Have someone keep squirting water at them while you rub them together. Finish off with very light pressure, and then a final smoothing with the nagura to remove any remaining scratches.
Bases
Professional woodworkers make a wooden base to hold each of their stones, carving it to an exact fit to match the shape of the stone. This is important, as when a stone starts to become thin after repeated dressings, it is liable to crack or break if resting on an uneven surface for use. But it is certainly possible to use stones without such bases. Placing the stone on a damp folded towel or rag will allow it be held firmly for use, and will protect it from breakage.
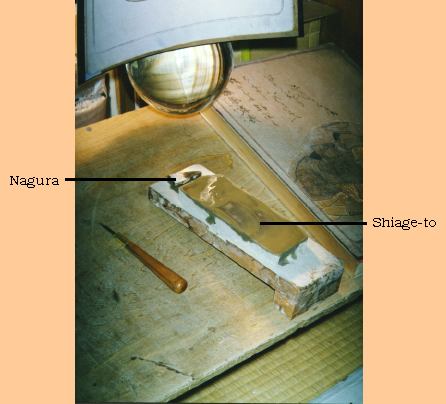
The traditional woodblock carvers here in Japan, because they do nothing but sit at a bench carving all day, have to arrange things so that sharpening their knives does not disrupt the work. To this end, they keep a wooden bucket of water on the floor beside them, across the top of which sits a small board holding the naka-to. A short stick of wood with a rag tied to the end is dunked into the water, and the carver uses this to splash water on the stone as needed. (In my case, I use a little plastic squirt bottle to do this ...)

Any number of times during the day, whenever the tool in use needs to be touched-up, the carver simply turns his body on the cushion, does the sharpening in a matter of moments, and then turns back to his bench. The shiage-to sits on one corner of this wide bench, with a small chunk of nagura resting on top of it, ready for use.
Experienced and professional woodworkers argue and discuss the merits of various stones endlessly, and when a carpenter here in Japan buys an expensive plane blade from a blacksmith, it is not uncommon for him to also receive a recommendation on not just a particular type of stone to be used to sharpen it, but a particular quarry, and even a particular level of strata in that quarry.
Although I'm not going to pretend to you that I am capable of understanding such nuance, I have had enough experience to be able to tell that particular knives and steels react quite differently to different stones, cutting much faster, or developing a much keener edge. For the inexperienced worker though, any normal inexpensive stone will do the job, and put an edge on the tool. ('Woodlike Matsumura' has a few such stones.)
Don't you be the idiot I was - buy some stones today!